The Zion Subway Hike: Harder Than I Expected
Looking for a crowd-free adventure in Zion National Park? Try the Zion Subway hike.
The Zion Subway hike (Left Fork of North Creek) is a true backcountry trek in Zion National Park. A wilderness permit is required, and only 80 people are allowed in the canyon per day. If you’re looking for a challenging hike in Zion without all the crowds, The Subway fits the bill. I thought it was a refreshing getaway from the usual hustle and bustle of the main drag of the park.
After spending more than 6 hours hiking the bottom-up route, scrambling through waterfalls, navigating river crossings, and swimming through icy pools to reach the famous Subway formation, I can confidently say this is one of Zion’s most rewarding hikes.
In this guide, I’ll cover permits, route-finding, gear, difficulty, and what the hike is actually like so you can decide whether The Subway is right for you.
➡️ Discover more about Utah National Parks and hiking in my Utah Adventure Guide.
Is the Zion Subway hike worth it?
Yes. The Zion Subway hike is one of the most distinctive hikes in Zion National Park, combining river hiking, route-finding, scrambling, waterfalls, and a permit-only experience. While the permit system keeps crowds low, hikers should prepare for multiple river crossings, navigation challenges, and a full day on the trail.
About This Guide
I hiked the bottom-up Zion Subway route with a wilderness permit and spent just over 6 hours on the trail. This guide is based on firsthand experience, including route-finding challenges, gear decisions, water conditions, permit logistics, and timing considerations.
Zion Subway Hike Overview
- Location: Zion National Park
- Permit required? Yes
- Distance: 7.4 mi
- Elevation gain: 1,250 ft
- Difficulty: Strenuous
- Trail type: Out & back
- Route finding: Required
- Best season: Late spring or early fall
- Time needed: 6-9 hours
- Zion Subway hike map
As with The Narrows, there are two ways to do the Zion Subway hike. Top-down requires canyoneering equipment, while bottom-up is considered a hike. The stats listed here are for the bottom-up hike.
AllTrails says the trail is 7.4 miles long, but I tracked 8.6 miles on my Garmin. You crisscross the river so many times and don’t walk in a straight line. I also recorded closer to 1,400 feet of elevation gain. Most of it is the climb out of the canyon at the end of the hike.
Zion Subway Hike vs The Narrows Hike
| Category | Subway | Narrows |
|---|---|---|
| Permit | Yes | No |
| Crowds | Low | High |
| Route Finding | Significant | Minimal |
| Water Hiking | Moderate | Near Constant |
| Difficulty | Harder | Easier |
If you’d like to know more about The Narrows hike, read my first-hand account. My guide will help you decide how far to hike in The Narrows and includes valuable tips from an avid hiker.
Is the Zion Subway Harder Than The Narrows?
Yes. The Zion Subway hike is generally considered more difficult than The Narrows. While The Narrows involves more sustained river hiking, The Subway requires route-finding, frequent scrambling, steeper terrain, and a wilderness permit. Most hikers find The Subway more physically and mentally demanding.
In my experience, much of The Narrows is straightforward. Follow the canyon and hike in the water. Done. The Subway, on the other hand, is not a maintained trail, and the canyon is wider. It’s possible to crisscross the river several times over a short distance. Think of it more as a pick-your-own-adventure-type trail.
Do You Need a Permit for the Zion Subway Hike?
Yes, a Zion Wilderness Permit is required at all times for The Subway, whether you are canyoneering or hiking.
How to Get a Zion Subway Permit
The seasonal lottery lets you secure permits in advance. Don’t worry, though, you still have a chance if you missed the lottery application window. We were able to pick up unclaimed permits after the lottery on a first-come, first-served basis.
Check Subway seasonal lottery status on Recreation.gov. All permits are issued on Recreation.gov, and I recommend downloading their app to your phone for easy access.
There’s also the daily lottery (2 days in advance) and walk-in permits (the day before or the day of) available if not all permits have been claimed. Learn more about the permit process for The Subway (Left Fork North Creek) on the NPS website. Lottery dates and requirements may be updated.
Picking Up Your Permit
Unlike permits for Angels Landing, you must visit the Wilderness Permit Office at the Zion Visitor Center to pick up your physical permit. Permits must be displayed on your vehicle’s dashboard. A ranger will go through everything you need to know about the Zion Subway hike and ensure you feel prepared.
➡️ Find out if the Angels Landing permit is worth it for your visit to Zion National Park.
We opted to pick up our permit the day before the hike. Note the Wilderness Permit Office hours to make sure they are open when you arrive. Times vary based on the season.
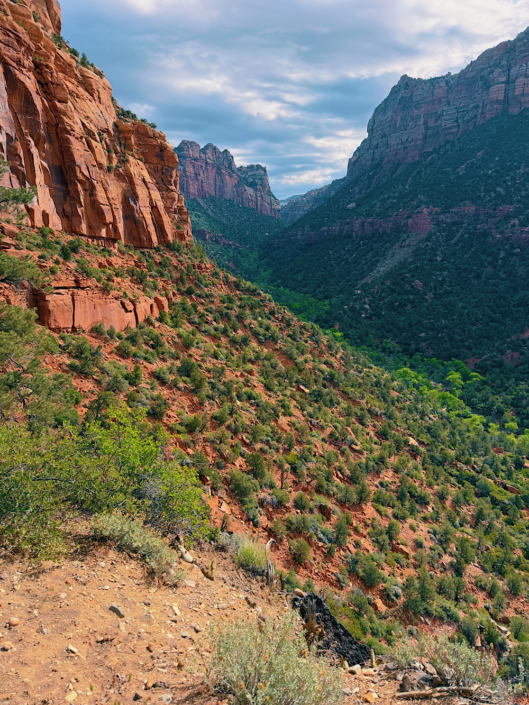
North Fork Canyon view from the start of the descent
Getting to the Zion Subway Trailhead
There are two trailheads for The Subway; the North Fork trailhead is for the bottom-up hike. To get there, you need to drive through Springdale, about 35 minutes from the Zion Visitor Center.
Use this Google Maps pin: North Fork Trailhead
There is NO SHUTTLE for the Left Fork trailhead. You must provide your own transportation. The Subway trailhead is off a dirt road, but it is well-maintained and features a pit toilet.
How Long Does the Zion Subway Hike Take? (6-9 Hours)
Most hikers should plan on a full day.
My hiking stats:
- Started around 9 AM
- 5.5 hours moving time
- 6.5 hours total time
We wished we had started earlier. The reason being that there were many incredible waterfalls as you got near The Subway, which I would have liked to photograph with my camera. We didn’t spend much time at the actual Subway, and it was hard to turn around after all the effort it took to get there.
Ideally, I would start at 7 or 8 in the morning, but if you want to beat the afternoon heat on the climb out, start even earlier.
What the Zion Subway Hike Is Actually Like
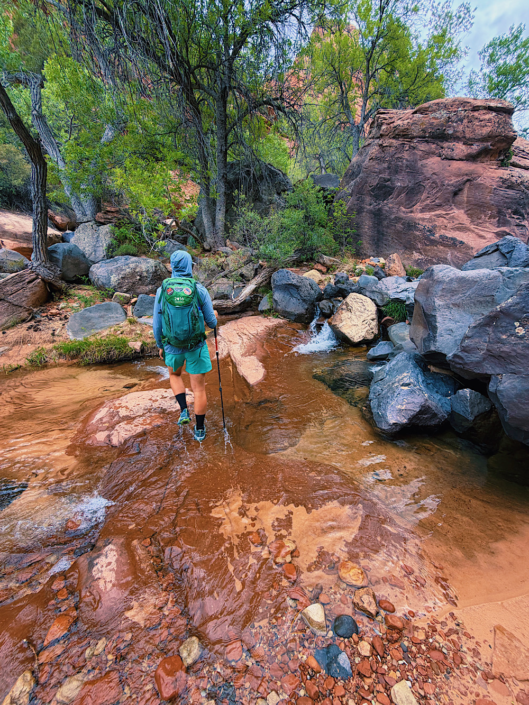
The first half mile of the Zion Subway hike is mostly flat. Once you approach the canyon rim, you must descend about 400 feet to the bottom. This entire trail is unmaintained. There are loose rocks on a steep grade leading down into the canyon.
I brought my trekking poles, and they aided me immensely on the downhill. Take your time, and you’ll be just fine if you’re an experienced hiker.
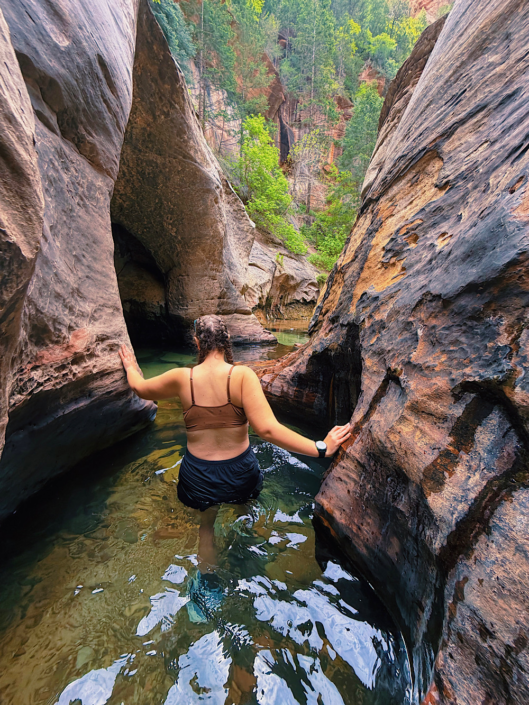
Navigating Through the Canyon
Now, when we were picking up the permit the day before, the ranger said, “Stick to the river. There are social trails on either side, but you should be close to the river at all times.”
Our group took this very seriously and stuck to the river the whole way to The Subway. The scrambling was intense at times. Literally walking up gushing waterfalls in pools of water, scrambling up and down large boulders.
I had underestimated the amount of scrambling on this trail. The interesting thing is, though, on the way back, I referenced the AllTrails map I had downloaded. I could see where we had hiked on our way in on my Garmin and compared it to the AllTrails map.
The route it recommended took us away from the water at times. I decided to follow it more closely on the way back to the trailhead and discovered that, for much of the time we were struggling to scramble in the river, there was a perfectly pleasant trail off to the side.
When someone says, “avoid social trails,” it usually means there is a correct way and that the social trail is negatively impacting the environment. I do my best to follow trails as accurately as possible and don’t take shortcuts. That being said, it’s unusual that the AllTrails map just so happened to correspond perfectly with these “social trails.”
If you’re looking for a challenging adventure and have plenty of time on your hands, I’d say follow the river. The AllTrails map provided a comparatively faster route, in my opinion.
Do watch out for snakes. We came across a few on the Zion Subway hike, including a rattlesnake. Give the snake plenty of distance and find a way around it.

Can you see the dinosaur tracks?
Dinosaur Tracks
About 2.2 miles in, dinosaur tracks are on the AllTrails map. As we approached the marked mileage, we asked a fellow hiker coming out if he had seen the tracks. He said no and kept walking in the opposite direction.
I kid you not, we walked about 30 more feet ahead, and the tracks were right there. The man had hiked right past them. We had a little laugh and admired the tracks.
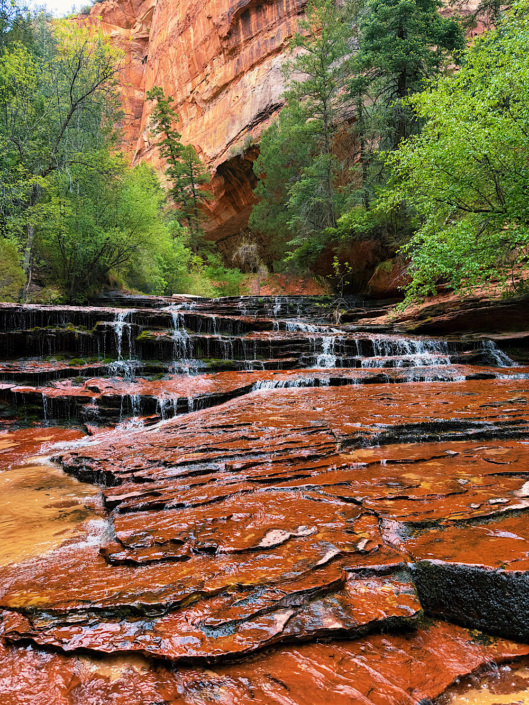
Reaching the Subway
There are a few waterfalls you must walk up before you get to The Subway. I was glad to have grippy shoes and didn’t have many traction issues.
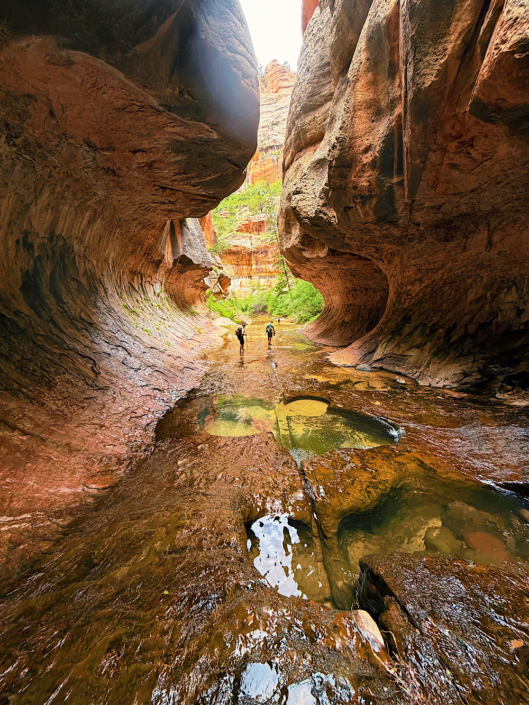
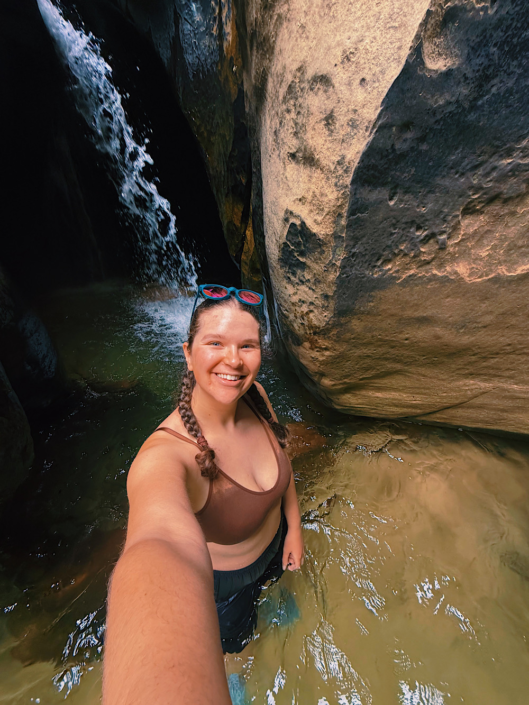
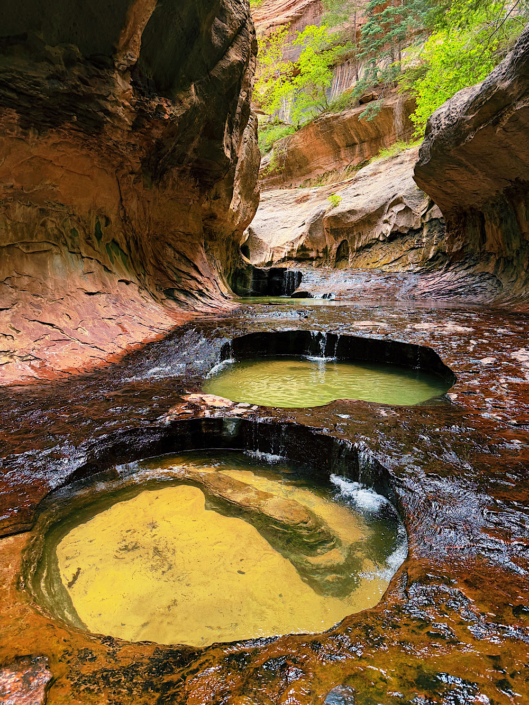
Upon approaching The Subway, you’re hit with a tunnel formation. It’s called “The Subway” for a reason. Round the corner to marvel at the crystal clear, sandy-bottomed circular pools.
Swimming to the Waterfall
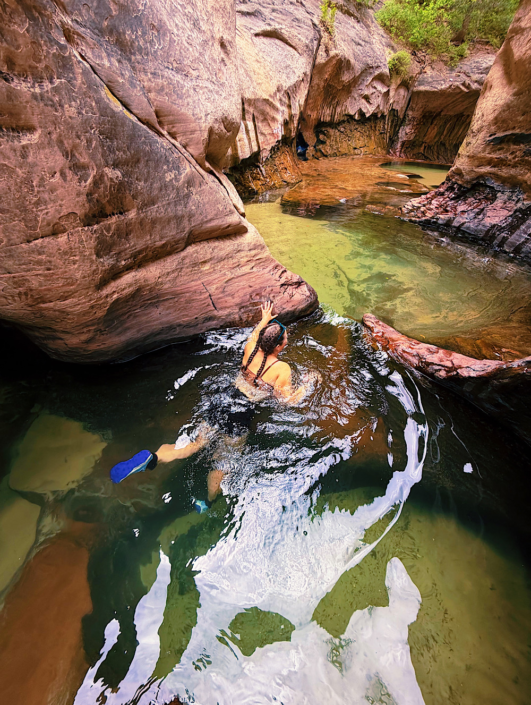
We knew that not very far into the tight slot canyon, there was a waterfall. The only pitfall is that we had to submerge ourselves in the freezing water to see it.
Stripping down to our underwear and shorts, we jumped into the deep pools and swam from ledge to ledge. The water was shocking but also refreshing. We could hear the gushing waterfall from around the bend.
Some canyoneers were rappelling down into the pools from the top of the slot walls. It was entertaining to watch, and I think they were entertained by us as well. With their dry suits on, the water wasn’t quite so jarring for them.
A Note on Toxic Cyanobacteria
There are cyanobacteria (blue-green algae) in the water in Zion National Park. While swimming in the pools at The Subway, don’t submerge your head or drink the water. Don’t submerge any open wounds. If you see any algae mats, don’t touch them. Use hand sanitizer before eating if your hands have been submerged.
Learn more about cyanobacteria in Zion on the NPS website.
The Climb Back Out
As I mentioned before, we followed the AllTrails map closely on the way back. It felt much faster not hiking through the river, and we reached the towering canyon wall in no time.
Thankfully, it was an overcast day, and the vertical trek to the parking lot wasn’t so bad. Many people say this is the worst part of the hike. The afternoon sun can beat down, adding to the exhaustion of the climb.
Who Will Enjoy The Zion Subway Hike?
If you love adventure-style hiking and don’t mind route finding, you’ll find this hike to be fun and challenging.
Who will love it:
- Experienced hikers
- Scramblers
- Photography lovers
- People seeking fewer crowds
Who may not:
- Beginners
- People who want a marked trail
- Those who are uncomfortable hiking in water
How Difficult Is the Zion Subway Hike?
The Zion Subway hike is one of the most difficult day hikes in Zion National Park. While the mileage and elevation gain are moderate, route-finding, river crossings, scrambling, and uneven terrain make it significantly more challenging than a typical trail hike.
Route Finding Is Harder Than Most People Expect
There is no one “correct route” through much of The Subway. We ended up hiking very different routes on the way in and out. Some scrambling sections might be easier on the way down, but not on the way up.
Look around before you pick your way forward. Reference a downloaded map. Overall, we spent far more time navigating than we expected. You can’t really get lost, at least, you’re following the canyon the whole way. It’s just the way you choose to traverse the landscape that can be tricky.
River Crossings and Water Hiking
You will get your feet wet while hiking The Subway. That is an inevitable fact. It’s better to embrace this than spend more time initially avoiding the water.
It’s not like The Narrows, where you’re hiking in fast-moving and sometimes deep water. This is hiking more in cascading pools and shallow water running over textured rock surfaces.
Scrambling and Obstacles
I knew there would be some scrambling based on the reviews I had read, but it ended up being more intense than I thought. Sticking to the river meant hauling myself up large boulders. There were some sections I saw on the sides of the canyon that bypassed the boulders, but had you hiking up and down very steep, loose-dirt paths.
The Zion Subway hike really has you pick your poison. Steep, loose climbs or boulder scrambling.
What to Wear for the Zion Subway Hike
The best clothing for the Zion Subway hike includes non-waterproof trail runners, neoprene socks, quick-drying shorts, and moisture-wicking layers. Expect multiple river crossings and wet feet throughout the day.
Trail Runners vs Hiking Boots
What shoes should you wear to hike The Subway? I found my non-waterproof trail runners to be ideal. They were comfortable for the 8+ mile hike and allowed water to flow in and out.
Learn more about trail runners vs hiking boots in my post, where I compare each in real-world hiking situations.
Neoprene Socks Are a Must
Hiking in neoprene socks is surprisingly comfortable. They help keep your feet warm and keep sand out, so it doesn’t rub against your toes and cause blisters.
If you’re also planning on hiking The Narrows, I’d recommend buying your own neoprene socks ahead of time. It will save you money on rentals, and you can use them for future water hikes like Mary Jane Slot Canyon near Moab, UT.
Quick-Drying Clothing
If you plan on swimming to the waterfall at the end of the hike, quick-drying clothing is ideal. I wore thin athletic shorts and merino underwear. Branwyn is my favorite merino underwear I’ve tried, and I wear it on all my hikes and backpacking trips.
Use my link to get $10 off your first Branwyn purchase. (Affiliate link: you’ll save $10, and I’ll receive a small referral credit at no extra cost to you.)
I also wore a merino sun hoodie. Contrary to what you might think, I stay pretty cool in a merino long-sleeve. See my merino hiking clothing guide for more details.
Avoid cotton! It won’t dry fast and becomes heavy when wet. You can bring a change of clothes if you’d be more comfortable with that, but I didn’t think it was worth the added weight in my pack.
Zion Subway Gear List
Must Bring
- Wilderness permit
- Water
- Food
- Trail runners
- Neoprene socks
- Layers
- Offline map
Nice to Have
- Trekking poles
- Dry bag
- Change of clothes
Have another pair of shoes and socks in your vehicle so you can change out of your wet ones. Also have a couple liters of drinking water waiting for you in your car.
Leave No Trace in The Subway
- Pack out trash
- Stay on durable surfaces
- Respect pools
- Follow human waste rules (WAG bags)
- Preserve this permit-only environment
Things to Know Before Hiking The Subway
- Permit required year-round
- Bottom-up route does not require technical canyoneering gear
- Expect frequent river crossings
- Route-finding is required
- Neoprene socks are highly recommended
- Trail runners worked well for me
- Start earlier than you think you need to
- Allow 6-9 hours
- Toilet available at trailhead
- Download an offline map before hiking

📌 Pin this image on Pinterest to save this post for reference.
Zion Subway Hike FAQs
Do you need a permit for The Subway hike?
Yes. A Zion Wilderness Permit is required for both the bottom-up hiking route and the top-down canyoneering route. Permits are available through seasonal lotteries, first-come, first-served reservations, and limited walk-in availability.
How difficult is The Subway hike?
The Subway is considered a strenuous hike due to route-finding, scrambling, river crossings, and uneven terrain. Many hikers find it more challenging than the mileage alone suggests.
How long does The Subway hike take?
Most hikers should plan for 6-9 hours on the trail. My group spent a total of 6.5 hours hiking the bottom-up route, including breaks and time spent exploring The Subway.
Can beginners hike The Subway?
Strong beginners may be able to complete The Subway, but previous hiking experience is recommended. The route is unmaintained, requires navigation skills, and involves frequent scrambling and water crossings.
What shoes should you wear for The Subway hike?
Non-waterproof trail runners work well because they drain quickly after river crossings. Neoprene socks are highly recommended for warmth and comfort in cold water.
Is The Subway harder than The Narrows?
Yes. Most hikers consider The Subway more difficult because of route-finding, scrambling, and steeper terrain. The Narrows involves more continuous river hiking but is generally easier to navigate.